

Having your car keyed is distressing. Knowing what to do to get the car fix will make the whole process easier and have your paint job renewed as quickly as possible. Here we look at what you should do after your car is keyed, options for fixing the paint job, how to fix a keyed car, and tips to help prevent being keyed.
The first step to getting the car repaired
Keying a car in the US is a crime. If you have car insurance, it is covered under the vandalism portion of your insurance.
Once you notice the car has been keyed, take pictures of the damage and the area around the vehicle. Then you need to call the police and file a report. Make sure to get a copy of the report for insurance purposes.
When you contact your insurance company to inform them about the vandalism, tell them you have a copy of the police report. Be sure you make two copies of the police report, so you have a copy too!
Once you file a claim
As you file the claim, the insurance company will have their adjuster come out and examine the scratch. If they don’t send out an adjuster, they will give you the name of a repair shop. The repair shop will examine the scratch and recommend how to fix the scratch with the insurance company. The insurance company lets you know what they will cover.
You can choose to do it out-of-pocket if you are not happy with the insurance company’s decision.
There are five categories of scratches, and the price increases as the levels increase. Scratch repair of minor scratches costs about $150, with deeper scratches costing over $1500.
Anatomy of a Paint Job
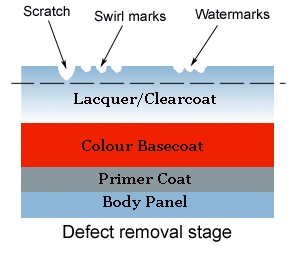
**Photo Courtesy: Detailing Wiki
Knowing the layers of your car’s paint job will help to determine the depth of your scratch. This will be very helpful if you choose to repair the scratch yourself.
Primer – This is generally a black or gray base coat sprayed on the car’s metal. It is a bonder for the base coat.
Base coat – Your base coat is the color layer in the paint job.
Clear coat – This is the protection layer. It is clear and protects the base coat from the sun and damage from the environment.
Scratch classifications
Understanding the classification of your scratch gives you and the insurance company the information they need to repair the scratch. Since most scratches combine several levels, your repair may be complex.
- First Level – Scraping or abrasion in the clear protective layer. You can only see the scratch if you look for it and are close to the car.
- Second Level A – Deeper abrasion in the clear layer. It may ding the color of the paint, or it may not. These are usually caused by things hitting the car like small stones or gravel, debris under wax applied without washing the car, and auto wash.
- Second Level B – The scratch is in the paint and the clear coat. This deeper scratch is in the paint layers but not deep enough to get to the primer.
- Third Level – The scratch has breached all three layers of your paint job. You can see the primer through the scratch.
- Fourth Level – The scratch is through the paint and primer to the metal.
Professional repair vs. do-it-yourself
Whether you repair the scratch yourself or have a repair shop do it comes down to knowledge (and some guts!) Sanding a car looks easy, but there is a science to it. If you’ve never sanded a vehicle before, you should probably let a professional do this job.
If you choose to do it independently, look up how to do it correctly before starting the process. If the insurance company is willing to cover the repair, why put yourself through the aggravation of repairing your scratch?
How to Fix a Deep Scratch
Peruse steps 1 – 10 steps before you start to repair the scratch. You don’t want to be midway through the process and then have questions.
Supplies
- Paint pen for auto touch-ups
- Fine paintbrush
- Clear coat
- Clean rags
- Auto compound rub
- Prep solvent
- Dark boot wax
- Clean rags
- Soft lint-free cloth or applicator that comes with the compound
- Spray bottle full of water
- Sanding block
- 2,000-grit wet/dry sandpaper
- Car wax
Before starting, wash the car with soap and water and dry the vehicle. If you want to skip washing the entire car, you can wash the area where the scratch is.
Step 1: Park in a well-shaded area. Direct sunlight will dry the compounds too fast.
Step 2: To see the scratch in more detail and depth, rub a small amount of dark boot wax on the scratch and wipe the excess off with a lint-free cloth. The scratch will be better defined.
Step 3: To remove existing grease and wax, spray the scratch with the prep solvent. Prep solvent will also help the paint to adhere.
Step 4: The 2,000-grit wet/dry sandpaper will need to be submerged in water for about 10-18 minutes or until it is soaked. Cover the sanding block with the soaked sandpaper and softly sand the scratch. You want to keep the area wet by spraying water on the scratch. Sand and frequently check the area with your finger to ensure it is smooth. You are removing the clear layer and it needs to be as smooth as possible.
Step 5: After sanding, clean the scratched area with a lint-free cloth. There will be minor scratches from the sanding that will be taken care of later. The place where you sanded should be dull.
Step 6: Using the paint pen for auto touch-ups, fill in the scratch. This part is time-consuming. Apply the paint in thin layers for the best results. Allow the paint to dry for 12 hours before applying a second coat.
Step 7: After the paint has dried for 11 – 13 hours, then apply a layer of clear coat on the paint. This will need to dry completely. Check the product instructions for the exact drying time.
Step 8: Apply the rubbing compound with a soft cloth, then hand buff or use an electric buffer set at 18. It may take multiple applications of auto compound rub and buffing until all the extra paint from the auto paint pen is removed. After you have buffed off the excess paint, wipe the area with a clean, soft cloth to remove any minor scratches from sanding.
Step 9: Apply and hand rub the polishing compound on the area. Using an electric buffer Remove any excess with a clean cloth.
Step 10: Seal the repainted scratch with car wax, then use the electric buffer or hand buff to a shine. Your scratch should be hard to find when finished.
Tips to help keep your car keyed-free
While you can’t stop someone from maliciously keying your car, there are some steps you to take to prevent it from happening
Park in high-traffic areas
You are less likely to be keyed in areas where others are walking by the car and the keyer can be seen. Park under lights at night, by doors, and in the front rows in a parking lot.
Use security cameras to your advantage
Park where there are security cameras. Cameras are a deterrent against crimes; if someone does key you, it will be caught on tape.
Buy a dash cam/have a car alarm installed
The alarm won’t stop the keying, but the attention it will cause will scare off the keyer, and hopefully, the damage will be minor.
The dash cam footage will show the keyer and help you get compensation and justice.
Park in the middle of the parking spot
Parking too right or left in the parking column irritates other drivers that could retaliate by keying your car. Squeezing out of the door close to another vehicle with keys in your hand can cause your car to be keyed accidentally by someone in this situation.


Leave a Comment