
Whether the glare on your windshield is from snow or sun, it can blind you. While we all know the dangers of not being able to see the road, not everyone knows there is something you can do to alleviate this problem. Here we take a look at window tinting. What you need to consider, the tinting process, how long it takes to tint a window, and how to install it yourself step-by-step.
Whether the glare on your windshield is from snow or sun, it can blind you. While we all know the dangers of not being able to see the road, not everyone knows there is something you can do to alleviate this problem.
Here we will take a look at what you need to consider for window tinting, the tinting process, how long it takes to tint a window, and how to install it yourself step-by-step.
How Long Does It Take To Tint a Car Window?
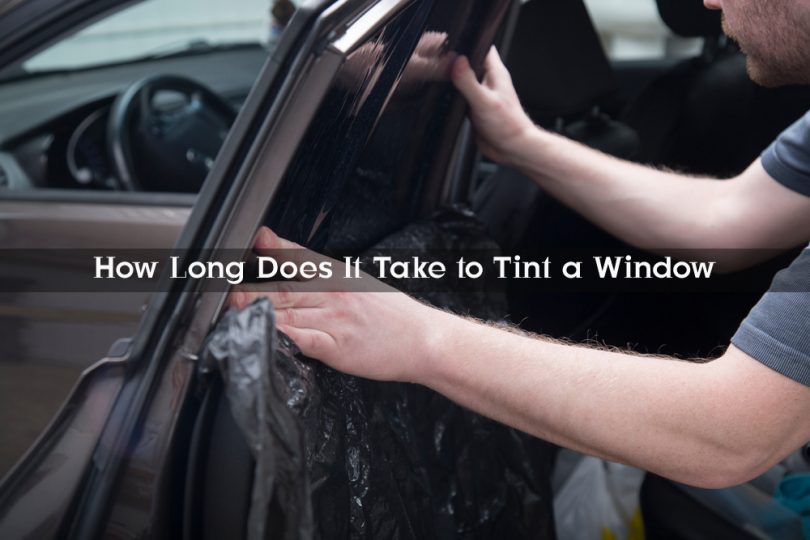
This mainly depends on who is doing the tint job. For a professional, it would take less than 30 minutes. If you are going DIY without any previous experience, keep at least two hours in hand.
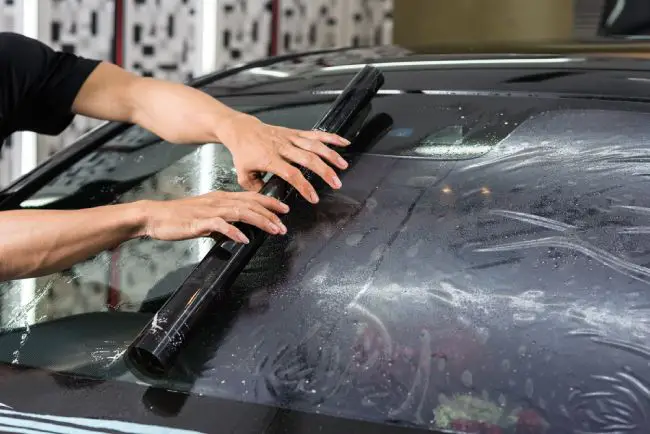
The window tinting process is two-step: installing the tint on the windows and curing. Installing the tint involves measuring the tint to the windows, cutting it to fit, then applying it to the windows.
Once the mechanic applies the film using a special adhesive, depending on the shape and size of the window, it will be shrunk to size with a heat gun.
The longest part of the process is the curing which can last up to 1 week. During the curing process, you cannot roll down the windows.
The top tint manufacturers don’t sell their products to consumers and you have no other option but to buy those low-quality stuff available in stores. They will look nice for a year or two but then will turn purple for sure!
The tint job will remain on your car for as long as you will own it. That’s why we recommend that you get professional help even if it costs you more. Otherwise, be prepared to end up with a bad, bubbly, peeling tint job!
Legalities
Before you tint your windows, check the laws in your state.
Some states prohibit window tinting. Some states have rules on what windows you can tint, and some only allow a percentage of darkness like 35% vs. 55%.
Checking your state’s law will ensure you won’t get a ticket and have to remove the costly tinting after you spend the money to have the vehicle’s windows done.
Why Tint the Windows?
-
Glare
The number one reason to tint the windows is glare. Tinting blocks the sun’s UV rays giving you good visibility and keeping your eyes safe.
-
Saves the interior
A Leather interior doesn’t tolerate the sun’s rays and heat very well. Exposure to both will cause the leather to crack and fade. Tinted windows stop the sun and save the interior.
-
Keeps the vehicle cooler
The blocking effect of the tint keeps the vehicle’s interior cooler and helps the car cool down quickly when you turn on the air conditioner.
-
The safety factor
While tint doesn’t make your windows shatterproof, if you are in an accident or something does hit the windshield, it will crack, but the glass won’t shatter and shower over you.
-
Fuel efficiency
Cooling a hot car in the summer takes extra energy, which uses more gas. The quicker the vehicle cools down and maintains that cool temperature, the more gas you save. While it may not be a huge saving, with the price of gas these days, any money you save on gas is a bonus!
-
Privacy
Tint blocks the view to the inside of your car, so you can leave your belongings in the car and not worry about anyone seeing them. It’s also nice not to have other drivers gawking at you and your family as you drive.
Things to consider before tinting windows
- Price
Tinting can cost between $200 to $400 for a good quality window tint with proper installation. Window tinting can last ten years and some companies offer a lifetime warranty. It is worth what you spend to tint the windows.
- Business reputation
Choose a well known and reutable company. If a company does poor tint installation, it won’t be in business long.
- Existing tint removal
The existing window tint needs to be removed before the new tinting is installed. Sheet tint isn’t hard to remove, but it needs to be done before applying the new tint.
- Number of windows to tint
How many windows you want to be done will make a difference. Obviously, tinting two windows vs. four will decide how long the process takes. Windshields and back windows also require more time.
- Window type
Window shape can make it harder to tint the windows. Rounded and slanted windows make tinting more difficult. Shape and size will increase the time it takes to tint the windows.
- Window size
When it comes to tint, size matters. The larger the window, the longer it will take to tint it, and the more detail it will involve.
- Warranty
Make sure they offer a warranty that includes bubbling and peeling, two of the most significant issues newly tinted cars have.
- Film tint quality
Check the quality of the tint they use. Poor quality tint won’t stop UV rays or last very long on the windows.
Best time to tint windows
Because most companies have air-conditioned workspaces when you apply the tint doesn’t matter as much as the temperature conditions. Ideally, spring and fall are best because there is less humidity and colder temperatures.
Higher humidity will prolong the curing time, but summer heat also makes for faster curing. The cold temperatures slow the curing process more than humidity.
During the winter, not only will the tint take longer to cure, you may not be able to roll down the windows for a while either. This ensures the tint cures and eliminates curling at the ends of the tinting sheets.
Self-tinting your windows using sheet tint
Tools
- Window tint kit
- Soapy water in a spray bottle with at least one gallon of made-up ahead of time
- Old rags
- Dry towels
- Scissors
- Razor blade
- Squeegee
- Heat gun
Step 1
Choose a dry, dust-free space to apply the tinting. Remove stickers and other things on the windows that will affect the application. Then vacuum the inside of the car to remove dust and dirt that will stick to the tinting sheets
Step 2
Start with the passenger window and spray the soapy water on the window, ensuring you get the seals and window edges. Scrape off dirt and grime with a razor blade. Do not use windex or window cleaner because it will make your tint purple!
Step 3
While cleaning the window seals, be sure to clean under the seals. Once the windows, seals, and edges are clean, use the squeegee to remove extra water, then dry with a clean cloth.
Step 4
Roll up any windows that are down and start the car so you can roll the windows up and down while you work.
Step 5
Locate the adhesive side of the sheet tinting and work with the sticky side facing you as you apply it.
Step 6
Use the spray bottle to moisten the outside of the window. This will help you move the tint in place and let it stick better.
Step 7
With the adhesive side facing you, stick the tint to the window. Unrolling as you go to apply it will make this a bit easier.
Step 8
Cut the piece off the roll once applied to the window. Then use the razor blade to cut the tint along the window.
Each side needs a few inches extra, so you have some extra to play with.
Step 9
Spray the tint with soapy water and squeegee the tint to the window so you can get an exact cut on the tint sheet.
Using the razor blade, make an accurate cut on the outer edge. Discard the pieces you removed.
Pull the cut edge 1-inch to match the window’s edge, so there is enough sheet under the window seal.
Step 10
Pull the tint back to the center, leaving 1/2 inch on each side of the window.
Step 11
Pull the film down about 1-inch. You want the bottom edge below the window. This tinting will go on the inside of the door eventually.
Now use the squeegee to flatten the sheet. When finished, do the right side the same way.
Step 12
Put the window down part way and match the film to the top of the window. Then using the razor blade, cut along the window edge. You should have about ½-inch on each side of the tint.
Step 13
Trim the corners. Use the razor blade you if need to clean the corners.
Step 14
Adjust the film to fit the window with the ½-inch excess on each side. If you need the tint to stick better, spray more soapy water, and reapply the tint on the window.
Step 15
Starting at the top of the window, use the heat gun and the dry squeegee to push the bubbles toward the bottom of the window. Note that there will be zig-zagging from the air stuck in the tint. This is a good thing.
Continue pushing the bubbles down. Then use the heat gun on the bottom of the window. Let the tint stay on the outside of the window.
Step 16
Prepare the inside of the same window as you did the outside using the soapy water and squeegee. Ensure you get under the seal. Once you are done, respray the entire window.
Step 17
Remove the tint from the outer window and peel the adhesive protecting layer down halfway, making it easier to work with. Use your fingers to get between the layers as you work it off.
Step 18
With the window down slightly, spray the top half of the exposed adhesive with water and place it on the inside of the same window. Adjust all sides of the tint to the window.
If you fold the tint, it will be easier to slide it under the window’s seal. Remove the adhesive back, spray the window and apply the tint until the whole window is finished.
Step 19
With your hand holding the tint in place, squeegee the water out using a downward motion.
Remove the water until the tint is smooth. The window is done when the water is out and the tint is smooth.
Continue these same steps for all the windows you are tinting. It should take 3 to 4 hours to do all the windows.


Leave a Comment