
Changing your brake fluid is a dirty job. Bleeding the brakes after changing the brake fluid is not only a hassle but time-consuming. Here we look at why you need to change the brake fluid, signs the break fluid needs changing, and how to change the brake fluid without bleeding the brakes using the Ranger method.
Why the brake fluid needs changing
Your brake system is a closed system. This helps keep out the debris, moisture, and air that can affect how your brakes function. Contaminated brake fluid affects how the brake feels as you press it down to stop and changes how the heat disperses with frequent stops.
Unfortunately, brake fluid is hygroscopic, so it absorbs the moisture in the atmosphere. When moisture gets in the brake system, it decreases the brake fluid’s boiling point, making it more difficult to stop as the heat builds in the system. Eventually, this moisture causes corrosion inside the master cylinder, the brake lines, and calipers.
It is cheaper to replace your brake fluid than to replace brake components. A professional brake fluid replacement and flush will cost about $100 vs. three times what you will spend to replace brake lines, calipers, or the master cylinder.
You can replace the brake fluid without having to bleed the brakes in your garage or driveway for much less than $100. If you don’t mind your hands getting dirty, you can save some serious cash by doing it yourself!
How Often Does Brake Fluid Need Changing?
You can find the best answer to this dilemma in your owner’s manual. It will give you the schedule best recommended for your vehicle. As a rule, you should change it every 30,000 miles or every three years. While some manufacturers may have you change it sooner, some don’t recommend changing the brake fluid at all. But if you are topping off your brake fluid and it looks dark and sludgy, you should do it then. Your brake system works much better with clean, moisture-free brake fluid.
You should change your brake fluid when…
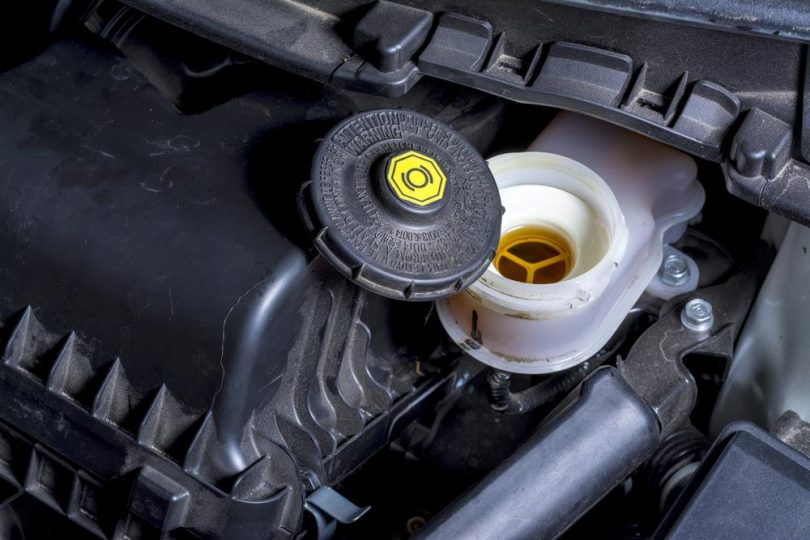
Your brake fluid reservoir sits under the hood and on top of the master cylinder. Checking your brake fluid for color, consistency, and change in fluid level should be done periodically as scheduled car maintenance to ensure your brake system is working at its best and that the brake fluid reservoir is full.
- It is dark or murky
Brake fluid should be a lighter brown to clear. You should be able to see through it. As brake fluid ages, it picks up dirt, air, and moisture, making it murky (similar to brown puddle water.) Dirty brake fluid needs changing as soon as possible.
- Air bubbles
The moisture absorbed by the hygroscopic properties in the brake fluid decreases the boiling point of the brake fluid, so if the brake fluid in the reservoir appears to be boiling, you need to change that fluid before you drive the car again to avoid damage to the brake system.
Brake fluid is vital to the pressure you can apply when braking. You can’t compress brake fluid, but the gas and air that build up from fluid boiling ARE compressible. The gas and air cause a spongy feeling when you step on the brake. You can go from a spongy brake to no brakes in the same drive, leading to accidents.
- Gunk in the brake fluid
It is not uncommon to have murky brake fluid with flecks of black and sludge. This is caused by the breakdown of rubber seals over time and the breaking down of the brake fluid. The sludge and debris can affect the efficiency of the brake system, so changing the fluid as soon as possible is the best plan.
- Brake fluid is low
If the brake fluid level in the reservoir is lower than half an inch below the max fill line, it’s possible the system leaks. While finding the source of the leak is the priority, maintaining a brake fluid level at the maximum fill line is essential.
A word about brake fluid
Brake fluid is rated by its wet (moisture in the brake fluid) or dry ( moisture-free brake fluid) boiling point. The DOT comes from the initials for the Department of Transportation that regulates the brake fluid industry. No two brake fluid formulas are the same. Each has its specific ingredients.
DOT 3 and DOT 4 differ in how they handle heat and moisture. DOT 3 absorbs less moisture, so you won’t have to change brake fluid as often. DOT 4 provides a higher dry and wet boiling point, so it is better for high temperatures. You can find the type of brake fluid your vehicle uses in your owner’s manual.
When changing the brake fluid in your vehicle, it is important to note how much fluid is in the reservoir because you will need to replace that amount, plus more if it is below the maximum fill line. Make sure you buy enough fluid to do the change. Buy the same brand that is in your vehicle. Never mix brake fluid!
The Ranger Method of Replacing Your Brake Fluid Without Bleeding
Tools
- DOT brake fluid recommended for your vehicle
- Flathead screwdriver
- Several clean rags
- Gloves
- Spray brake cleaner
- Drain pan
- 100 ml syringe with tubing or Lubrimatic syringe
- Funnel
- Vinyl or rubber mat
Step 1: Place a rubber mat on the front of the car where the brake fluid reservoir is located. Brake fluid is extremely corrosive and will eat the paint off the metal. Put on your rubber to save the painted surfaces on your vehicle.
Step 2: Find the brake fluid reservoir over the master cylinder (on most cars) and spray brake cleaner on the cap and around the top of the reservoir. Using a clean rag, clean any debris off the cap and the outer part of the reservoir to keep any dirt and debris from falling into the reservoir.
Step 3: Note the amount of brake fluid in the reservoir (this is the amount of brake fluid you will need to put back in. Remove the cap and shake any excess brake fluid into the reservoir. Place the cap on a bare metal area of the engine.
Step 4: Using a flathead screwdriver, remove the reservoir filter. Empty any brake fluid in the filter into the drip pan. Then place the filter on a clean rag and spray it liberally with brake cleaner. Place it upside down on the rag to drain and leave it on the cloth to dry. The brake cleaner will evaporate while you are finishing the brake fluid change.
Step 5: Place the tubing attached to the syringe in the reservoir, touching the bottom, and slowly pull the plunger up, sucking out the brake fluid. Empty the syringe contents into the drain pan. You may have to do this several times until the reservoir is empty.
* If a cage holds your screen, you can push the tubing through the slots to get as much fluid out as possible.
Step 6: Place the funnel in the reservoir and fill it with new brake fluid until it reaches the max fill line.
Step 7: Place the filter back in the reservoir and twist the reservoir cap into place. Spray brake cleaner on the reservoir cap and time let it dry.
Because you are not emptying the entire brake system, you must follow these steps monthly and replace the fluid again. You will do this 2-3 times or until the brake fluid is clean when you go to replace it.

Leave a Comment