How much does a car air filter cost?
Engine air filters are a critical component in maintaining your vehicle’s performance. They work to prevent dust, dirt, sand, and other debris from being pulled into the engine.
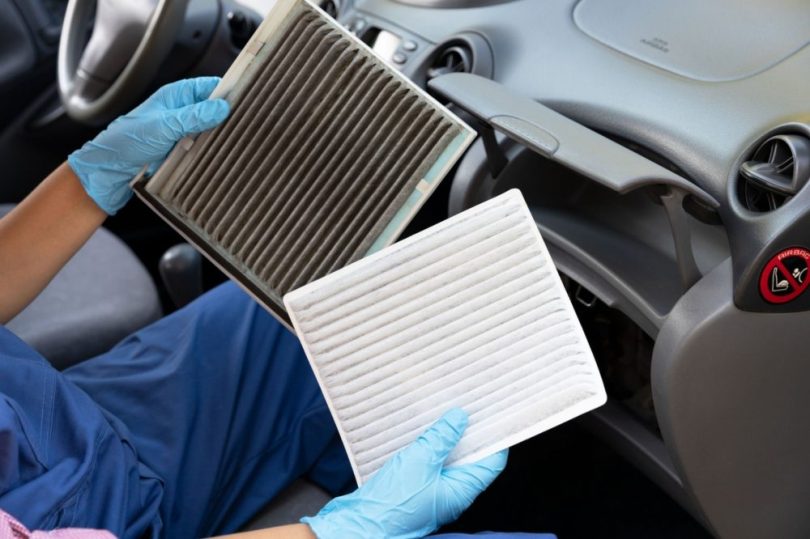
On the other hand, cabin filters trap dust, bacteria, and odors to keep your car interior environment clean and ensure you a comfortable journey.
So both types of air filters are important – one for your engine and the other for comfortable driving.
Filters price
Both engine and cabin air filters are cheap and usually cost between $10- $40, depending on the quality and brand.
However, if you’re looking for a premium engine filter with cutting-edge technology, you may have to shell out as much as $200.
Replacement labor cost
If you’re not comfortable with changing the filters on your own, you’ll have to add labor cost for replacement, which can be anywhere from $20 to $40.
But, if you’re interested in learning more about air filters and how to replace them yourself, you’re in the right place!
Keep reading to know more about how much a car air filter costs.
Why Do You Need to Change Engine Air Filters?
Fuel efficiency
After going a thousand miles of distance car filters get so dirty to allow air to flow properly to the engine which in turn, increases the demand for fuel and before you know it, you’re filling up more often and paying more at the pump.
Reduce emission
When the airflow to the engine is reduced by a dirty filter, it can put a strain on the system responsible for controlling emissions. By changing the filter you could avoid potential problems or risks down the line.
Long life of engine
Tiny particles like sand, dust, and other materials can cause serious engine damage over time. It’s necessary to change air filters regularly to keep the engine running smoothly.
Why Do You Need to Change Cabin Air Filters?
Better driving experience
A well-functioning cabin filter can protect harmful particles which will keep your car interior free from pollution and allergens and enhance your overall driving experience.
Protects the car’s HVAC system
A dirty or clogged cabin air filter can put a strain on your car’s heating, ventilation, and air conditioning system. This can lead to performance issues and long-term damage to the system. But replacing filters on time can minimize this risk to your HVAC system.
How Often Do You Need to Change Your Air Filter?
Driving circumstance
The amount of debris in the air varies depending on where you live. If you live in a dry, dusty area you will have significantly more dust in your vehicle. Seasonality can also have an impact because pollen and spores are released into the air at different times of the year.
The more severe your driving conditions, the more frequently you should replace your air filters.
Use of vehicle
Usage is an important factor to decide when you need to change your air filters as heavy-duty cars and commercial vehicles need frequent maintenance rather than light-duty vehicles.
Standard maintenance routine
The majority of car manufacturers provide replacement guidelines for various car components, including air filters. It’s crucial to follow these guidelines to keep your car running smoothly in a tidy environment.
Types of Auto Air Filters
Engine air filter
| Filter Categories | Driving condition | Reusable | Replace time | Replacement Cost | Cleaning cost | |
| Paper | Dry & dusty | No | 10,000-15,000 miles | 15-70$ | N/A | |
| Foam | Pre-oiled | Dry & dusty | No | 12,000 miles | 15-70$ | N/A |
| Post-oiled | ||||||
| Gauge | Dry | All condition | Yes | 5,000 miles | 15-180$ | 20-30$ |
| Oil | ||||||
Cabin air filter
| Filter categories | Driving conditions | Protection | Replace time | Replacement cost |
| Particulate | Porous fibrous | 0.3 microns | 15,000-30,000 miles | 5-50$ |
| Charcoal | Porous + charcoal layer | Microscopic contaminants and odors | 20-75$ | |
| Activated | Activated carbon layer | Gasses (fumes and odors) | 40-75$ | |
| Electrostatic | Electrostatically charged layer | Dust, pollen, odors and bacteria | 180-200$ |
Different Shapes of Auto Air Filters
Panel
Panel air filters have a flat plane surface which is comparatively larger than others and allow more air to pass through. Most dry air filters are panel shaped but they can also be round.
Cone
The majority of the oil filters are cone-shaped which allows air to flow at a uniform rate though some manufacturers use inverted cone shape filters to increase airflow.
How to Change the Filter on Your Own?
a) For engine air filters
Step 1: Select the right types of air filter for your car
First things first, make sure you have the right type of filter for your engine.
Step 2: Locate the engine air box
Once you have the right filter, it’s time to get started!
Pop the hood of your car and take a look for the air filter box which is usually located near the engine.
Step 3: Remove the air filter cover
You will find the filter box cover secured with some screws, loose the screw with your tool kits and take off the cover.
Step 4: Replace the old one
Now it’s time to replace the old filter, pop it out of the rubber rim that seals off the unit’s interior, and replace it with the new one. Make sure the rubber rim is sealed properly to prevent any air leakage.
Step 5: Put the cover back
Finally, put the cover back on and tighten those screws, and you’re all done!
b) For cabin air filters
Step 1: Check the windshield areas
Before you get to the cabin air filter, take a moment to inspect the windshield area and make sure it’s clear of any obstructions that might interfere with airflow into the cabin.
Step 2: Locate the cabin air box
The easiest way to find your cabin air filter is to search for your car model online and look for the cabin air box location or you can check your user manual.
Step 3: Open the filter cover
Every car is designed differently, but it is easy to open the cabin air filter cover and you probably won’t need any tools to do so.
Step 4: Replace the old filter
In some vehicles, removing the cabin air filter is straightforward; you just need to pop it up, but in others, it could be a tight fit. Take care when installing the new filter so it doesn’t get damaged.
Step 5: Put the cover back
Make sure the filter cover is properly attached once you’ve finished.





Leave a Comment