
In the 80s, the car industry went from the cable throttle system to electronic throttle control. The computerized upgrade is more efficient but not without some problems.
Here we will look at how the ETC works, signs the system is faulty, how to reset the ETC, and how to fix the electronic throttle control.
Electronic throttle control unit explained
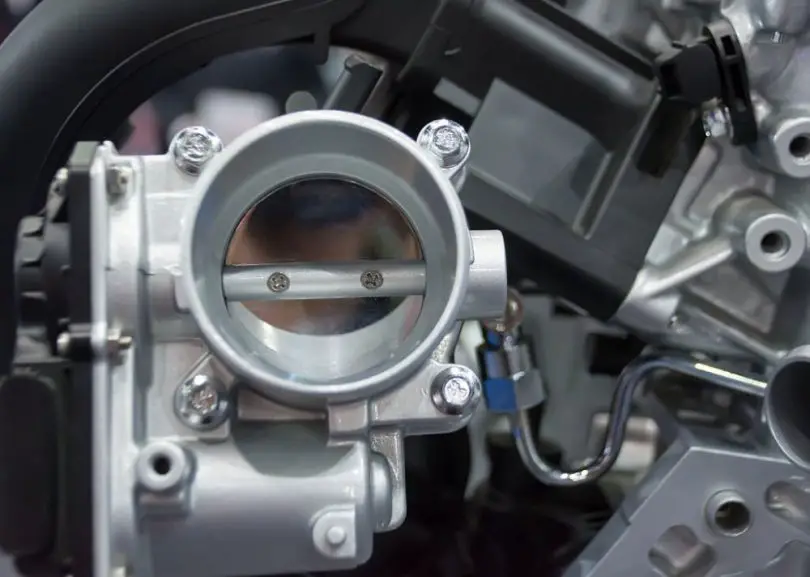
You can find the electronic throttle control on the top of your engine between the intake manifold and the air intake. Its purpose is to maintain the perfect fuel-to-air ratio, which is critical to the engine running at its best.
When stepping on the gas pedal, the mechanical linkage moves inward to open and close the butterfly valve. The mass air flow sensor reads the oxygen levels inside the butterfly valve. The electric control module uses this information to create the ideal air-to-fuel mixture via the fuel injectors.
The electronic throttle control connects electronically to the ESC control, cruise control, and engine control, ensuring all the systems are running as they should.
Advantages of the electronic throttle control
- Without the electronic throttle control, you wouldn’t have other driving conveniences like cruise control.
- Its ability to detect an increase or decrease in traction and read braking and steering data increases the vehicle’s safety.
- The electronic throttle control eliminated the functional components that require maintenance and repair, making it easier and more affordable to take care of the car.
Reasons Why an Electronic Throttle Control Is Faulty
1. Butterfly valve clogs
Carbon build-up, dirt, and debris are the most common causes of a clogged butterfly valve. No matter what causes the clog, the vehicle stalls or won’t start when it doesn’t open.
2. Throttle body damage
When the parts of the throttle body that move aren’t appropriately maintained, have wear and tear, or are damaged, the butterfly valve will not work correctly.
3. Wires are damaged
Corroded, broken, and damaged wires stop the signal sent to the throttle body from the sensors. The butterfly valve doesn’t know what to do, so it does nothing.
4. Throttle position sensor is bad
Your car’s computer depends on the throttle position sensor to tell it how much to open the throttle. A bad sensor will cause the throttle to open too much or not enough.
5. Pedal position sensor has gone bad
Beneath the gas pedal is a sensor that tells the computer the position of the pedal. Once you step on the gas, the position goes from the sensor to the control module, which adjusts the position of the throttle. The throttle’s position is compromised when one or both of these is faulty, and the ETC light will come on.
Signs of A Bad Electronic Throttle Controller
1. The engine stops
Pushing the engine when the electronic throttle control is malfunctioning can lead to the
engine stopping as you drive, a situation that puts anyone in your vehicle and driving near you at risk.
2. Poor fuel consumption
Because the ETC controls the butterfly valve, when it isn’t working correctly, too much or not enough air will get in and affect the car’s gas consumption.
3. Erratic idling, stalling, and misfires
When the throttle body opens too much, it increases the oxygen in the fuel-to-air mixture, and the car idles rougher.
When the throttle body doesn’t open enough, there is a lack of oxygen in the fuel-to-air ratio and the vehicle stalls. It is felt like a jolt or vibration as you are driving and, depending on the lack of air, can be slight to severe.
The wrong fuel-to-air ratio will affect the engine’s combustion in the cylinders and create a misfire that sounds like a gunshot.
4. Flashing throttle control light
When the indicator light flashes, the problem is severe. Driving the car is not advised. Doing so could cause damage to the engine.
5. Reduction in acceleration
A decrease in acceleration happens slowly. You may not notice it until your speed is significantly reduced or acceleration is non-existent. It occurs when the ECT isn’t working correctly, and you go to accelerate. Still, the ECT is not sending the signal to the throttle body resulting in the butterfly valve not opening enough or at all, creating a dangerous situation for you and the vehicles behind you.
6. Throttle control light stays on
When the light stays on, this is the first warning that something is wrong. Do not ignore the light. The problem will only get worse. Checking it out as soon as possible saves costly repairs.
7. Erratic throttle control
Like the reduction in acceleration, you are driving, go to accelerate, and nothing
happens. There is no increase in speed while you drive, then you start speeding up but aren’t pressing on the gas pedal. The throttle can not control the car’s speed. Sporadic throttle control is very dangerous and needs immediate attention.
How to the Fix Electronic Throttle Control?
1. Resetting the electronic throttle control
Step 1:
Turn the key to the “on” position without starting the car. Wait 3-5 seconds, then slowly press the gas pedal to the floor. Release the pedal and push it a second time, going halfway down. Hold the pedal for 5 seconds at the halfway point, then slowly release it.
Step 2:
Wait 10 seconds, now press the gas pedal for 10 seconds. The engine light will start blinking as the diagnostic test mode II comes on. Release the pedal and wait 10 seconds more before stepping on the gas again.
The check engine light should start blinking as the electronic control unit resets.
Step 3:
Once the 10 seconds are over, release the gas pedal, then turn off the ignition.
The ETC should have reset.
Note: If the reset was not successful then try the steps again. A few seconds’ difference in the timing is enough to interrupt the reset.
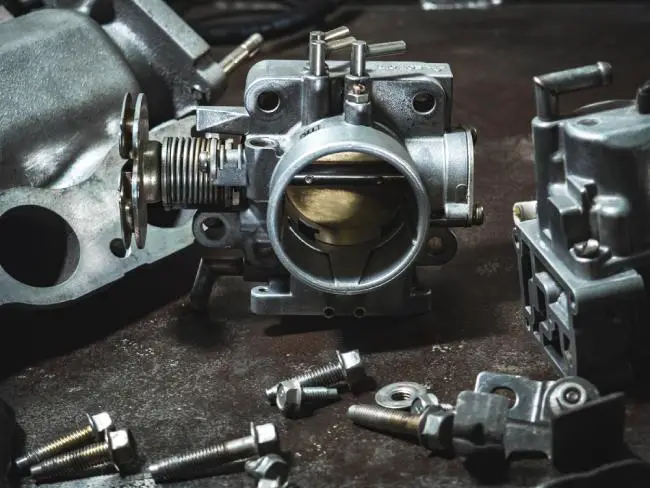
2. Replacing the Electronic Throttle Control
Tools
- Screwdriver
- Ratchet and socket set
- Safety goggles – optional
- Brake cleaner
- Gloves – optional
- Replacement throttle control
Step 1: Locate the electronic control on the engine’s top between the air intake and the intake manifold.
Tip: Check your owner’s manual to see if you need to initialize (using a scan tool) the new throttle control after installation.
Step 2: Disconnect the negative (black) battery cable and put it aside.
Step 3: Using the screwdriver, loosen the air intake clamps and slide off the air intake tube. Depending on the vehicle, you may have to remove any electrical connectors or hoses attached to the air intake. Consult your manual.
Step 4: To remove the electrical connectors on the throttle control, push the tabs down and pull the connector off. On some vehicles, the tabs pry back; to do this, use the screwdriver.
Step 5: Use the ratchet and appropriate-sized socket to remove the bolts that hold the intake manifold and throttle body together.
Step 6: Remove the throttle control. Then using the screwdriver, pry off the throttle control gasket.
Use brake cleaner and a clean cloth to clean the throttle control gasket. Replace the TC gasket if it is not in good condition.
Step 7: Put the new throttle control gasket and the new electronic throttle control in place.
Step 8: Put the bolts that hold down the throttle body in place using your fingers, Doing them one at a time. Next, use the ratchet to tighten the bolts.
Step 9: Plug in the electric connectors just as you removed them.
Step 10: Slide the intake hose back into place, using the screwdriver to tighten the clamps.
Step 11: Replace the negative battery cable and tighten it.
3. Replacing the accelerator pedal position sensor
Tools
- New accelerator pedal position sensor
- 12mm wrench
- 10mm socket with extension
- Adjustable wrench
- Gloves – optional
Step 1:
Locate the accelerator pedal position sensor on the firewall with the hood open.
Step 2:
To remove the cover, remove the two 10 mm bolts on the side without the wire harness.
Step 3:
Unplug the wire harness from the sensor’s housing, and remove the other two bolts from the sensor’s bracket, sliding the bracket between the different components to remove them.
Step 4:
A cable runs from the gas pedal to the sensor. The sensor is on a spring, so you need to twist the sensor and release the cable’s tension as you remove the sensor’s hooked end. With the wrench, unbolt the nut that attaches the bracket to the cable.
Now use an adjustable wrench to hold the nut on the other side as you loosen the bolts. Save the bracket because you will need it later.
Step 5:
You may need to twist the spring to make room for the cable as you put it around the sensor.
Step 6:
Retighten the nuts that attach the cable and bracket, replace the housing cover and bolt the bracket and housing cover.
Step 7:
Plug the wire harness back in and replace the last two bolts that hold the housing to the firewall.
Step 8:
Take the car for a drive to ensure the sensor works properly.
4. Cleaning the butterfly valve
Tools
- Throttle body cleaner
- Safety glasses – optional
- Gloves – optional
- Soft cloth
- Phillips or Torx screwdriver
- Old toothbrush
- Flashlight
Step 1:
Make sure the car is parked and in a well-ventilated space.
Step 2:
Locate the negative (black) battery terminal, loosen the cable, and remove it.
Step 3:
You need full access to the throttle body. Remove the air intake hose using the Phillips screwdriver or TORX to loosen and remove the clamps that secure the air intake hose.
If you need to, remove other components in your way. Once off, remove the air intake hose. If your vehicle has more than one air intake hose, remove only one for the cleaning. Be careful of any wires or electric connectors as you take off the hose.
Step 4:
Use the throttle body cleaner to spray the inside of the air intake hose. Give the cleaner a few minutes to dissolve any residue, then use the toothbrush and rag to remove debris, varnish, and gunk from the air duct.
Step 5:
Next, spray the inside of the throttle body with the same cleaner. Use small sprays so you don’t flood the area with cleaner. Be sure to spray the valve plate and the throttle body where sticking occurs on the valve plate.
Let the cleaner dissolve the gunk, then use the cloth and toothbrush to remove the gunk from the throttle body, cleaning small patches as you go along until all the metal is clean. Do not move the butterfly valve!
Step 6:
Once the throttle body inside and outside is clean, have an assistant turn on the ignition but not the vehicle. The butterfly valve should open so you can clean under the valve plate. Use the flashlight to see the valve plate better as you clean to ensure they are free of varnish.
If the valve doesn’t open, you can open it with a gentle push, Do not force it! Pushing too hard will cause the lever system and gear to break, and you will need to replace the throttle body. Gently place the toothbrush or cloth inside to clean it.
Repeat the cleaning until the throttle body and valve plate is clean. Keep the hood open when finished until the cleaner evaporates.
Step 7:
Replace and reclamp the air intake hose. Replace any other components you removed and tighten them down. Ensure they are tightened correctly to avoid a new check engine light warning.
Step 8:
Start the engine. There may be a start delay, but it should turn over quickly. The vehicle should idle smoothly. The idle should respond as soon as you press the gas pedal.
Is it safe to drive with the throttle control light lit?
Yes, you can drive with the throttle control light on, and it may be safe for a short while. But the longer you drive with the light on, the more damage you may do to the engine.
With the faulty electronic throttle control, you can turn a modestly priced repair into a $700 to $800 repair the longer you drive. Eventually, the improper air-to-fuel ratio will affect the vehicle’s acceleration and create a safety risk, sometimes sooner than later.
No one wants to step on the brake to slow down and have the car slowly move forward. Then you go flying forward at a higher speed.
The light is the warning that something is not working right and needs to be looked at. It is much safer to have it looked at sooner than later!


Leave a Comment