
The most common google search among Ford F150 owners is how to reset the battery light on a Ford F150. Once the battery light is lit, it needs to be reprogramed. Here we look at why the battery light comes on, how to reset the battery light, how to do the battery relearn and how to reset the electronic control module.
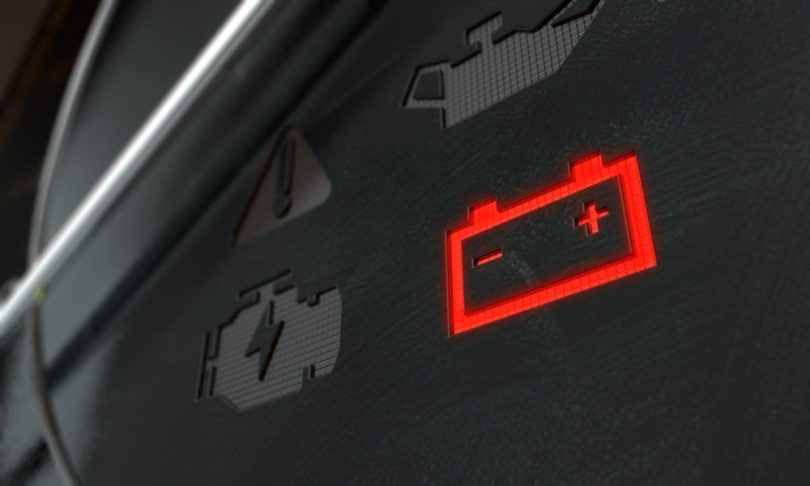
The battery light
When the dashboard battery light is illuminated, it warns that your battery isn’t recharging. Fixing the cause of the warning light is only half the process. Once the issue that caused the light to come on is resolved, you still have to rest the battery light.
The light comes on when you start the car and then goes off, but a light that comes on and stays on is a problem. The most common reasons for the light to come on are battery damage, the alternator is going, or it is gone, or your alternator belt is loose.
Reasons for the Battery Light to Come On
Faulty alternator belt
A loose alternator belt impacts the recharging of the battery. It uses a pulley to produce the mechanical energy that the alternator converts into electrical energy. If the alternator belt is loose or has damage, the alternator won’t get the mechanical energy needed to recharge the battery.
The battery isn’t holding its charge
There are two reasons the battery isn’t holding the charge, it is too old, or it is not getting the electrical current from the alternator. Batteries only last for three to five years. If your battery is old or it is not holding the charge, and it is not the alternator or the alternator belt, there is a good chance you need a new battery.
It’s worth checking the cables and wires to the battery for damage as they can affect how your battery charges. Running a test on the battery will tell you if you need a new battery.
You can test the battery using a multimeter. Turn off all the car’s accessories, shut the engine off. Set the multimeter to 20V DC. Attach the the multimeters wires to the battery’s terminal (red to red, black to black.) A multimeter reading lower than 12.4 volts means the battery needs a charge.
The alternator needs to be replaced
While most alternators should last six years or more, not all of them do. If your accessories fade in and out or stop altogether, they are not getting the electrical power they need. Using a multimeter is a quick and efficient way to check your alternator. You won’t be driving very far if you need to replace your alternator.
To check the alternator, you will need two readings, the battery voltage reading and an alternator vaoltage reading.
To check the alternator, ensure the car is park and idling, then set the multimeter to 20V DC. Placing the multimeter probes on the positive and negative battery terminals (positive to positive, negative to negative,) check your reading. A reading between 14.0 and 16.0 means the alternator is good. A reading below below 12.6 means the alternator is not charging the battery.
Ford F150 Battery Reset
Tools
- Wrench
- Rags
- Old toothbrush
- Baking soda
- Water
Step 1: Locate and loosen the bolt on the negative (black) battery terminal, then remove it. If the terminals are corroded, now is the time to clean them. Place baking soda on the terminals, and add a small amount of water. When the baking soda and water finish fizzing, use the toothbrush to clean the terminals. Rinse with water and dry the terminals with a rag.
Step 2: Once the negative battery cable is off, the battery light resets. To recharge the battery, start the car and let it idle. The alternator will recharge the battery as it idles. Let the car run for 3-5 minutes.
Step 3: After 5 minutes, shut off the car, reconnect the negative terminal cable to the battery, and tighten the bolt.
How to Do a Battery Relearn
As a warning light comes on, a code attached to the warning light is present. If you have a scan tool, you can read the code. Once the code is read, you must do a battery relearn to clear the code and the car’s computer can relearn its fuel trim (air/fuel mixture) and idle.
If your truck uses Flex fuel, the computer will have to relearn the fuel’s ethanol content, the idle, and fuel trim.
Step 1: Park your truck, engage the parking brake, and shut off all accessories. If you have a cellphone, laptop, or other accessories plugged into the car, unplug them.
Step 2: You want the engine to continue idling until the car reaches the operating temperature (the needle for the temperature gauge should be in the middle.) The truck will need to run for a few minutes.
Step 3: Once the truck is at operating temperature, turn on the air conditioning and idle it for another minute.
Step 4: Leave the air conditioning running as you press and hold the brake pedal down. Disengage the parking brake and place the car in drive. Let the truck idle for a minute more.
Step 5: Take the car for a 12-mile drive so it can relearn the fuel trim, idle, and ethanol content if you have a Flex fuel vehicle. Skipping the 12-mile drive delays the truck’s ability to relearn the fuel trim and idle and will cause issues until the relearn is completed.
In a Flex fuel vehicle that runs on E85, not doing the drive may cause issues affecting how the truck starts, how it drives, and the engine may not start.
Step 6: Once you return from the drive, the relearn is complete, and all accessories can be plugged back in.
Resetting the PCM After Installing a New Battery
Suppose you had to replace your vehicle’s battery. In that case, you need a computer reset to ensure the power control module can recognize the electrical system and continue to adjust it.
Step 1: Check your owner’s manual for the location of your fuse box.
Step 2: Once you’ve found the fuse box, find the fuse that powers the vehicle’s computer. It should be marked “Power” or “PWR.”
Step 3: Pull out the fuse and wait 30 seconds, then put the fuse back in.
Step 4: To reset the computer, let the truck idle for 5 minutes.


Leave a Comment